About the Project
I wanted to experiment with the ESP8266 WiFi Controller. Also, I was interested in creating a totally solar/Lipo powered remote box. As it turns out, I had the perfect project that allowed me to test it out. It would be convenient to know if the mail carrier placed mail into my box as well as knowing if someone at home has removed the mail. When I come home from work, I would not have to walk down to the box to get the mail, only to discover it has already be removed.
 There was a slight problem, well, a HUGE problem I encountered when I completed this project using my ESP8266 WiFi controller. I discovered that my ESP8266 nodemcu development board was not able to receive the WiFi signal at my mailbox in front of my house. The distance was too far or hindered because my house is encased in steel siding. I was so disappointed. I know there are other ESP8266's that have external WiFi antennas and are able to handle the distance. I decided to start over and use my spare Electric Imp003. The Imp is another WiFi controller that DOES have an amazing WiFi range. The programming is very similar. The ESP8266 is programmed with the Arduino IDE library and the Imp003 is programmed online through the Electric Imp Cloud. Seen Here: Electric Imp Online. There are multiple Imp versions. I happened to have an extra Imp003 sitting in my box of electronic parts.
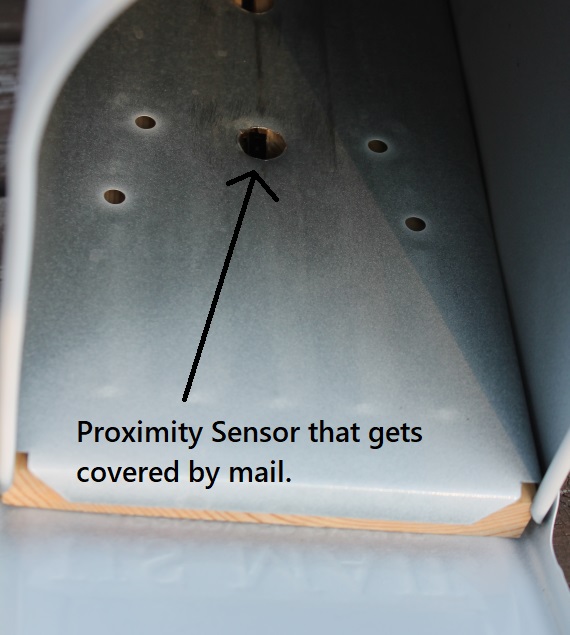
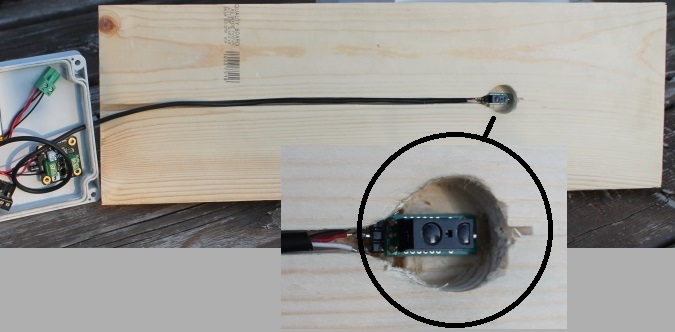
 The Imp003 periodically "wakes-up" (Every 5 minutes) and determines if anything is covering the proximity sensor and sends that information to a remote website. That's all it does. The remote website does most of the 'magic'. The proximity sensor is mounted under the mailbox pointing up through a hole. It senses objects between 0.5cm and 5cm (2 inches) above the surface. Any mail placed in the box will cover that sensor. The mailbox itself protects the sensor from rain and weather as it positioned in the wood base that mounts the mailbox to the post cross-arm.
 Since the Imp003 or the ESP8266 can send data to any URL, you have some options on how to handle the status of the sensor. I chose to use a PHP script on my own webhost to receive the mailbox sensor status and to do the necessary smartphone messaging. You can use any service or cloud that you wish. In my case, my wife gets a text when the mail arrives in the mailbox. After she removes the mail, I get a text telling me that the mail has been picked up ... I don't need to walk to the mailbox when I get home. I can also click an icon on my phone and query the status (a bit set on my website).
Since the Lithium battery can only be charged during the day, preferrably a sunny day, I need to conserve as much power as I can. The Imp controller plus the sensor will draw about 90ma of power when it is connected to WiFi and reporting status. That process takes about 15 seconds. If I put the controller to 'sleep', the power drops to 8ma total. That is a significant drop in power. You can see updates below where I now put the Imp in "deep sleep" for 15 hours , overnight.
Note: My mailbox is about 30 feet in front of my steel-sided house (on the street). With the Imp, I'm well within range. Just by luck, the side of my mailbox post faces sort of South/South West, so I mounted one panel on each side to pick up morning sun and afternoon sun.
The parts required:
Scroll down for photos, schematics, and Imp scripts (to download). I will also include the ESP8266 sketch (program), since it did work great even though the WiFi reception failed. A more expensive ESP8266 might work just fine.
Electric Imp003 development board - This is what I'm using for my controller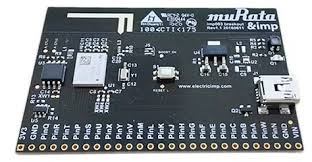 The Imp controller is the main 'brains' of the project. You can purchase one of these for $30, which is expensive compared to the ESP8266 ($6 on Ebay). The programming is done all online with the Imp Cloud IDE. Using an Imp as a developer is free, but the cloud is a requirement. You don't ever have to hook a PC to the imp, in fact, you can't. It's all done through an online IDE (cloud --> WiFi). That USB connector you see is only used to power the Imp with a 5VDC USB charger. This is where I purchased it: www.digikey.com
ESP8266 nodemcu development board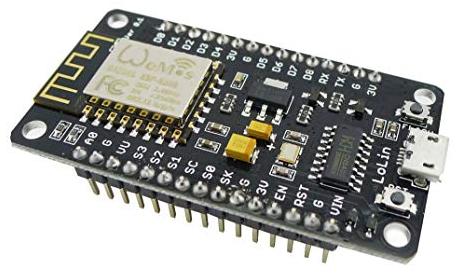 Here is what the $6.00 ESP8266 board looks like, with the 'questionable' WiFi PC Board antenna. The Imp003 also has a PC Board antenna, but it receives 100 feet away from my house! I think one of the problems with this board design is the module assembly is mounted over the main board ground plane and is not extended away from the main PC (printed circuit) board. Purchase an ESP8266 or ESP32 with an optional external antenna that is designed for longer range. This would be more expensive though.
Software for the Imp and the PHP script
Be sure to view the scripts needed for the Imp and the PHP script. Links at the very bottom of this page, in the footer section. Of course, you can have your Imp or ESP8266 report the prox sensor status to any URL. If you use Twilio, that can be your method to text your phone when mail arrives.
The Lipo Battery Fiasco
Update: October 8, 2019
So everything has been working perfectly since the day it was installed. I have never run out of battery power. It reports the mail correctly every day. BUT ... I have now learned that regular Lipo batteries will not work when Winter comes here in Minnesota. We have temps to -40F, and many temps below 0F. The Lipo battery will fail, and charging will be futile. So I replaced it with a LiFeP04 Battery (Lithium Iron Phosphate) and a new solar charge controller that handles LiFeP04 batteries.
I realize that LiFeP04 batteries will function at low temps (to -25C), but not very efficiently. They also don't recommend charging them in the cold. I am going to 'throw caution to the wind' on this one and see what happens. I will be using only one 3.2 LiFeP04 battery cell. I am thinking the 'cautions' I'm reading about are for 'multiple banks' of LiFeP04 batteries that need to be balanced and charged in a controlled way at room temperature. I'm only using one battery, the current draw is small, and the charge rate is slow. See the new January 20th posted update at the bottom of this page.
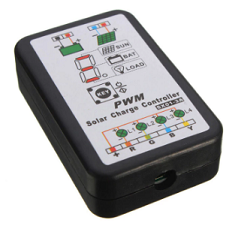 I purchased one of these on AliExpress.com for $7: 3A 6V 12V 3.7V 3.2V 7.4V 11.1V LI-ION NI-MH LiFePO4 Battery Solar Panel Charger Controllers Regulator made by Park Street Garden (that's what is says ... did the China manufacturer make-up the name?).
It is a universal solar charger that accepts my 6VDC solar panel and can output 3.2 volts to my LiFeP04 battery and load, which will directly power the 3.3V Electric Imp003. The controller is designed for LED street signage but can be configured for normal loads such as a microcontroller.
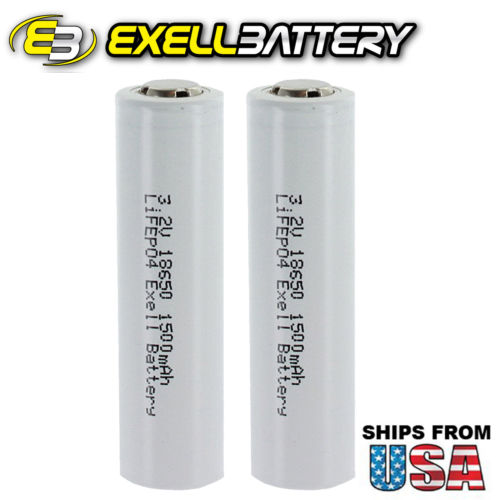
The battery approx. $10 for 2 of them: 3.2V 18650 1500mAh LiFePO4 Battery. I'm only using one of these since I have no way (or knowledge) to balance them properly.
The Solar Charger Controller has nice screw terminals inside. I did't use the plastic box that comes with it. I just mounted the circuit board inside my project box. It has tons of universal functions. For programming, you use a single pushbutton to scroll through and change the operating parameters. I have it set for "load on all the time", 3.2V LiFePO4 single cell, disable night-day sensor, enable 100% full power, no flashing. It seems to be designed primarily for solar powered road signs, where it has night/day, LED modes, flashing, different animations.
On the charge controller, there is an LED digit that lights segments to indicate solar,battery,load status. This LED does consume some milliamps and does not appear to have any way to disable the LED (to save power). I might buy another one of these and look for a way to cut a circuit trace to disable this LED.
The Lipo that will be replaced by a LiFeP04 Battery
I'm going to keep this Lipo Battery information here because it works really well at ambient temps. For any other projects that may be in a temperate climate or indoors, this works good.The Lipo Battery
This is a basic 1500mAh Lithium Polymer (Lipo) battery that provides 4.2vdc on a full charge and 3.7vdc nominally. I purchased on Ebay for $5.00 + $3.00 shipping. Lipo shipments take longer because of special handling of Lithium batteries. I chose the 1500mAh size without knowing what size I should really purchase. I'll find out later if I made the right choice.
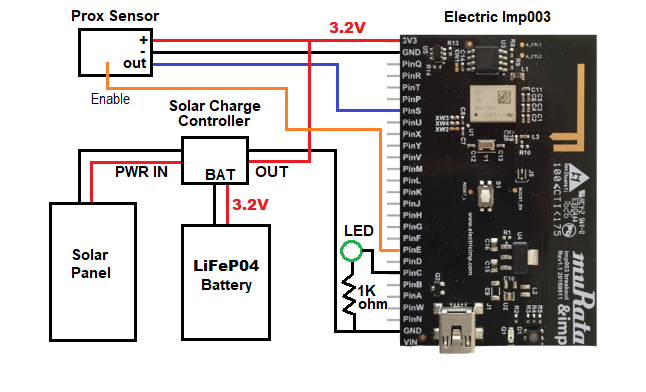
The Solar Battery Charger for the LiPo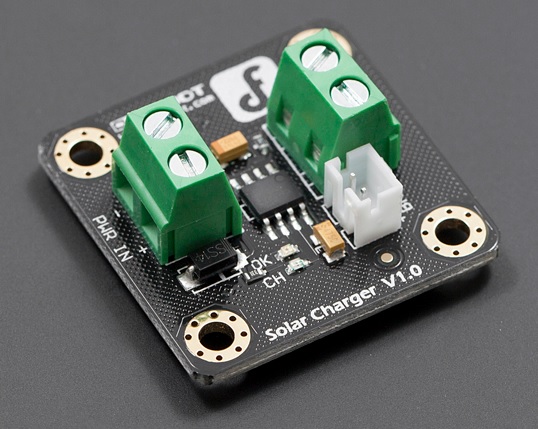 The solar charger handles the distribution of power between the battery and/or the solar panel. It safely charges the Lipo battery while providing power to the controller at the same time. A fully charged Lipo is around 4.2VDC. The Imp003 has a built-in 3.3V regulator. If I wire power to the VIN pins of the Imp, the regulator handles the 4.2V I'm not sure yet where the regulator cutoff will be when the Lipo loses enough charge. I'm hoping the balance of night/day (solar panel) keeps the voltage high enough. The other option is to wire the charger directly to the 3.3V pins. This is a problem because 4.2V on the 3.3V pin will damage the Imp. I could put an IN4001 diode in series with the + side to drop the voltage to around 3.4V, which is what I had to do with the ESP8266. I'm hoping I don't have to do that. Time will tell.
Proximity Sensor
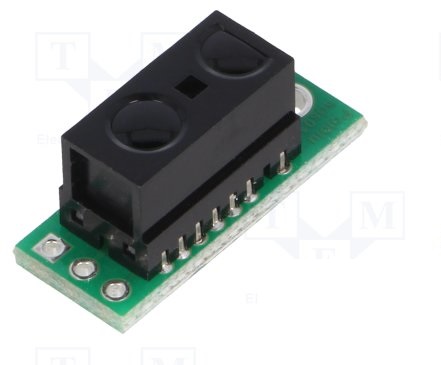 This is a Sharp Distance Sensor/ Proximity of up to 5cm. Pololu Carrier with Sharp GP2Y0D805Z0F Digital Distance Sensor 5cm
This is facing up from the underside of the mailbox, through a hole drilled in the bottom of the box. It only detects up to 5cm (2 inches), so if no mail is covering the sensor, it won't see anything. Cost is approx $12.00 which includes shipping and handling.
A piece of pine board fits under the mailbox. It is screwed to the mailbox post cross-arm, and the mailbox is screwed into the board from the side. A hollowed-out hole is bored into the board and a slot is made to route the cable to the back of the mailbox. The PVC water tight box is mounted to the back of the mailbox.
Putting it together ...
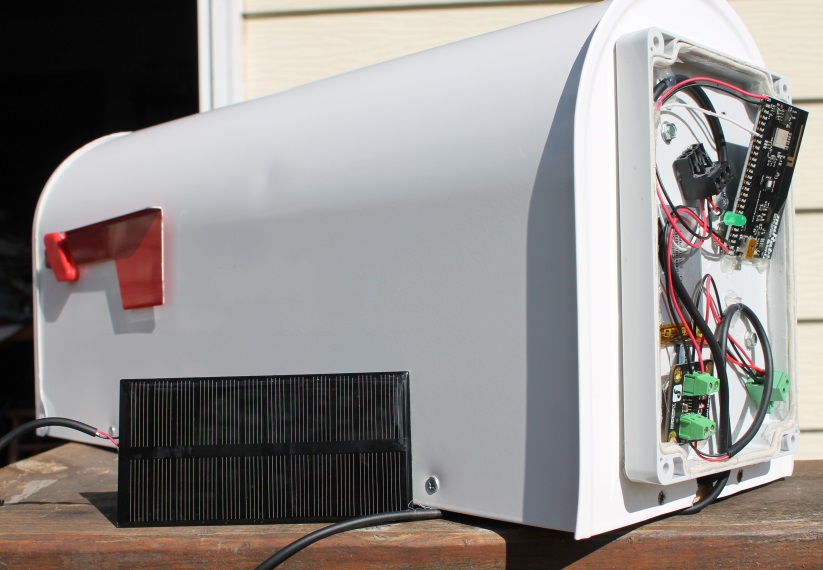
Shown below with attached solar panel
Search Ebay: 2W 6V Polysilicon DC Output Solar Light Solar Panel Waterproof Outdoor
Once the box is mounted on mailbox post arm, the solar panel will be mounted on the vertical post, facing the sun. I will tilt the panel slightly so car headlights will not reflect on the shiny surface. I mounted the Imp003 board tipped-out as far as it can and still fit under the cover. My goal is to get the WiFi antenna as far away from the metal mailbox as possible. The PVC plastic box of course has no affect on the WiFi signal.
Electric Imp003 Wiring with LiPo Battery in warm temperature climates
The extra connectors you see in the photos are only used to connect wires together ... in case I need to disconnect and replace cables or components. The Imp has many pins for general IO. I selected pins 'S' and 'C' arbitrarily. Any pins can be used if defined in program. Imp003 is sort of overkill for one sensor, but the WiFi reception is exceptional and it works great. The green test LED is used for a visual check. Each time the Imp wakes up and connects to WiFi, the LED blinks one time if no mail is detected and blinks twice if the sensor is covered.
Powering using the previous mentioned LiPo battery

Powering directly using the LiFeP04 battery
Moving into the Winter season in Minnesota, I will now power the box using a LiFeP04 battery. Since the battery is 3.2VDC, it can directly power the Imp003 without the voltage regulator. I will update this later on the success or failure of my defiant decision to not heed the rules.
Modification: October 23, 2019
After 3 days of rain, there was not enough Sun to charge the LiFeP04. So I reduced some more power consumption by using the Enable pad on the Prox Sensor. Cut the trace marked with carat and solder a new wire to the Enable pad. The "E" output pin on the Imp003 enables the Prox Sensor only when it needs to see if the sensor is covered by mail. Otherwise the Prox Sensor is in "Low Power Mode". I will now see if that gets me through the rainy days.
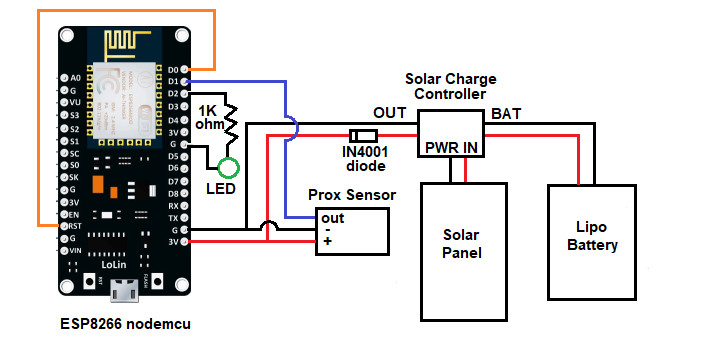
ESP8266 Wiring - Shown here in case you would rather use an ESP8266
The power is connected directly to the 3.3V input pins. The solar charge controller can output 4.2vdc which can damage the ESP8266. A diode is inserted in series with the positive wire to drop the voltage to 3.4vdc. The orange color wire is the "sleep reset" signal. This allows the controller to wake-up after 5 minute sleep timer. To program the ESP8266, this wire must be disconnected during program download. The green LED performs the same visual test as the Imp003 version.
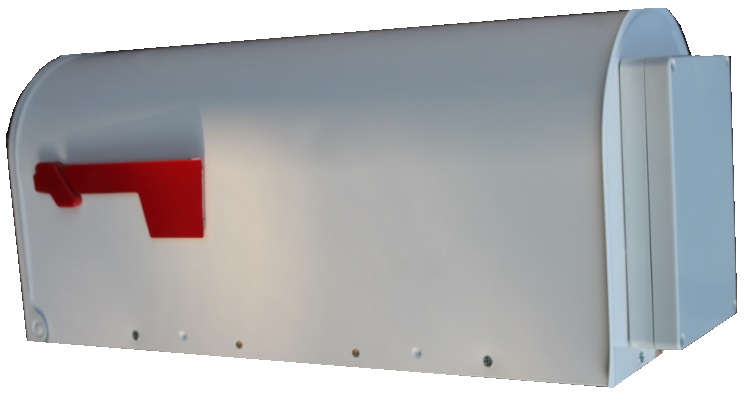
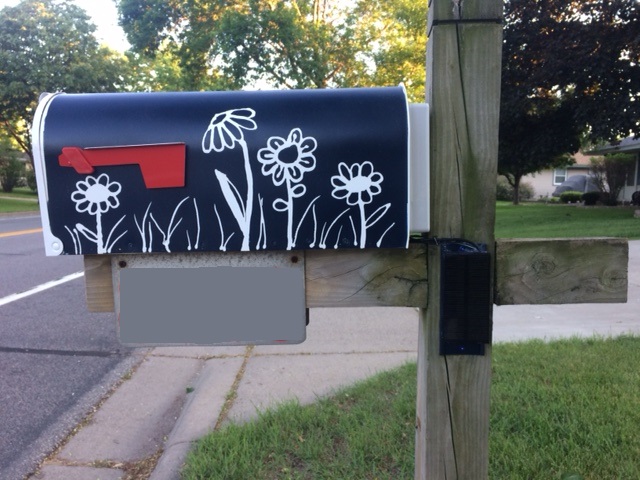
Finished Mailbox - painted by my daughter.
Notice how the electronic box and solar panels are not too obvious. I mounted the solar panels on a piece of plastic and angled them slightly so they don't reflect back to on-coming car headlights. I should have purchased a new wood post, maybe later. The gray metal panels under the mailbox are for my home address numbers.
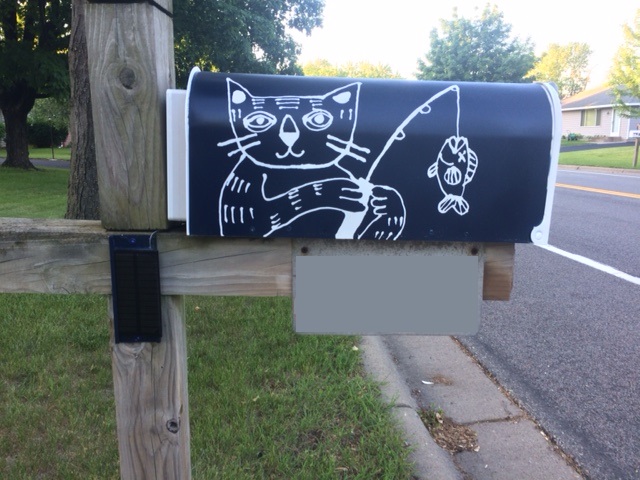
Two Solar Panels facing opposite directions
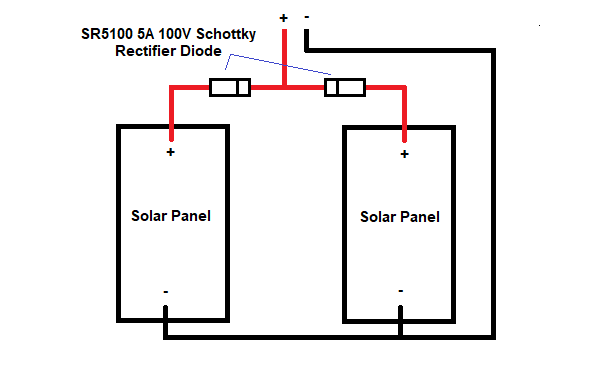
I needed two solar panels to allow charging during mornings and afternoons. Whenever panels are wired in parallel, to avoid back feeding the weaker panel, wire some diodes to allow current to flow in one direction only. These are also known as "shading" diodes. This scenerio typically happens when many panels are wired in parallel and one or more gets covered with leaves, snow, shade, etc.
Update on January 29, 2024
It's been over four years now! Can you believe it?It Is holding up well and working every day. After a few years of sun, rain, and snow, the solar panels have gotten "cloudy" and not charging very well. So I purchased two new identical panels from AliExpress and a new LiFeP04 battery, even though it didn't really need to be replaced. The Imp Cloud still exists for free and I hope that continues. Electric Imp was bought out by Twilio and Twilio has now been bought out. Instead of using PHP to email to my iphone, I'm now using PushOver.net which has an IOS app. The notification is better looking and seems to be more reliable than my webhost's email server.
Update on October 22, 2020
Working great so far. The "cloudy" solar panels are still working despite not looking very good. LiFeP04 battery is holding together and it works every day ... has not failed since July. Now, the weather is getting colder as Winter arrives and the daylight is getting shorter by the day. Had a bad snowstorm a couple days ago and the snow plow whacked the mailbox with wet snow pretty good, but things are still working fine. If we ever get some nicer, warmer days, I should take some photos to show the condition of the mailbox. A good inspection of how things look.
Update on July 1, 2020
Things running smoothly with a couple of hiccups. I should have bought LiFeP04 batteries with leads attached, or used a AA battery holder. I taped wires to the battery ends and the tape fails making it lose connection. This is my fault though. I re-taped it and will fix it later. I noticed my solar cells are starting to get a cloudy look to them. It's probably due to bad quality. They claim they are weatherproof, but for the cheap price, I assume they are not the best. The same thing happens to solar garden lights but they still work. Overall, it's really nice knowing when the mail arrives and being notified it's pickup up and brought into the house. When the wire fell off the battery and it was not working for a couple of days I felt sort of anxious not knowing if there was mail sitting in the box.
Update on January 20, 2020
Can you believe that January is almost over? It's been cold. Let's say -20F at times. I can't believe the LiFeP04 is still working perfectly. I haven't touched the control box since November. The deep sleep through the night has been key to keeping the battery charged. Keep in mind that I'm only using one battery, which is the size of AA batteries. I have a larger LiFeP04 sitting on my workbench, but it won't fit inside my box. There have not been any problems with snow covering my solar panels (I worried about that). I am amazed to say the least. I highly recommend the universal solar battery controller from AliExpress. It seems like a great solution to powering a project and charging batteries at the same time. Without sounding like I'm advertising for Electric Imp, I should mention again that all of the imp programming is done online, using the Imp IDE. I can access and modify the imp program at any time without touching it. As long as it has power and WiFi access, it can be modified. I realize there are libraries and sketches to push code to ESP's, but the imp IDE doesn't require a degree in computer science. The imp is built around its cloud service, and updating is insanely easy.
Update on November 24, 2019
The LiFeP04 seems to be doing OK. But it's November and the daylight now is shorter, the Sun is lower in the sky, and we have a lot of cloudy/rain/snowy days in a row. So the power was lost after 4-5 days of this. I now made another change. When the Imp wakes up and sends the prox sensor status to the PHP script, it waits for a response back from the PHP script. The PHP script determines the time of day and sends back the number of seconds the Imp needs to deep sleep. The Imp Agent then sends that "sleep time" to the Imp Device. If the hour of the day is 7PM, the PHP script sends back 54000 seconds (which is 15 hours). Otherwise it sends back 300 seconds (5 minutes). I'll see now well it runs over time. Deep sleeping for 15 hours should save a ton of battery use.Using a 2nd Imp for visual monitoring
I also have another Imp that lights up an addressable RGBLED with various colors. Green = 5 minute sleep, everything is OK. Purple = Imp is in deep sleep overnight. Blue means that the Imp is supposed to be reporting every 5 minutes, but has failed to report after 15 minutes ... it's "frozen", or dead (not running), perhaps the battery is dead. This lets me know how the system is running without logging into my Imp Cloud.
Update on October 23, 2019
After 3 days of rain, there was not enough Sun to charge the LiFeP04. So I reduced some more power consumption by using the Enable pad on the Prox Sensor. Cut the trace marked with carat and solder a new wire to the Enable pad. The "E" output pin on the Imp003 enables the Prox Sensor only when it needs to see if the sensor is covered by mail. Otherwise the Prox Sensor is in "Low Power Mode". I will now see if that gets me through the rainy days.
Update on October 8, 2019
Everything has been working amazingly good! Well ... I had one problem. One day the mail came and the letter on the bottom of the pile happened to have a black semi-gloss graphic on the side facing the sensor. The sensor sort of flip-flopped on whether or not it was covered. We received about six 'mail in', 'mail out' text messages before I realized what happened. I will assume that situation will not occur very often.
Another time the mail was tipped at an angle, where the bottom piece was a Shutterfly Photo Box. The sensor still detected it properly even though it was very close to the distance limit of the sensor.
Only once did the mail carrier push the mail so far back into the box that the sensor was not covered. I worried about this happening, but I only want to use one sensor. Adding another sensor adds more current draw to the battery. Since this has only happened one time, I don't think it's an issue.